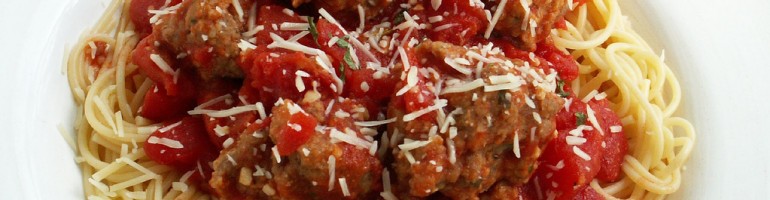
Happy Valentine’s Day from Spaghetti & Meatballs!
My Big Fat Pasta Post
Last Sunday, I devoted the entire afternoon to making fresh pasta. In between mixing ingredients and rolling dough, I took some step-by-step photos (plus a video!) to help make the process more clear.
Full disclosure: I’m hardly an expert. This was only my second time making fresh pasta (the first was New Year’s Eve), other than with my grandmother. But if a non-expert like me can do it, hopefully the process will become a bit less intimidating.
I followed the recipe for Fresh Egg Pasta Dough from the book Glorious Pasta of Italy. (I actually have the Kindle edition, which is lend-able. If you’re interested in this great book, I’m happy to lend my edition — it’s a two-week loan — to the first reader who asks! I just need your email address.) The recipe is also available here.
Making a pound of pasta (following the recipe once) takes about an hour and a half. If you’ve ever eaten fresh pasta, you know that’s time well spent. And making fresh pasta is a fun, relaxing, enlightening experience that truly puts you in touch with your food.
Ingredients:
- 2 cups unbleached all-purpose flour
- 1 tablespoon semolina flour, plus some extra
- 1/2 teaspoon fine sea salt
- Pinch of freshly grated nutmeg
- 3 extra-large eggs
- 1 tablespoon extra-virgin olive oil
Directions:
Put the first four ingredients into the food processor and pulse a few times to combine.

Then add the eggs and oil.

Process the mixture until it forms a dough ball and crumbs that look like curds.

If the mixture is too dry, add oil. If it’s too sticky, add flour.
Place the dough onto a flat surface dusted with semolina. Knead the dough until it is smooth (this may take several minutes).

Form the dough into a ball and wrap it in plastic wrap. Let the dough rest for 30 minutes.

Once the dough has rested, it’s time to flatten it. Start by cutting the dough into four equal pieces. Three pieces should be wrapped and set aside. Briefly knead the other piece, then flatten it with a rolling pin until it’s about three inches by four inches. Use your pasta machine on the lowest setting to further flatten the dough.

Before passing the dough through the next narrow setting, you need to continue to smooth it out. Fold the dough in thirds and run it through the machine again. Continue this process until the dough is smooth. (You might need to dust the dough with semolina to prevent sticking.)
With the machine set at the next narrow setting, run the dough through twice. Continue this process until the dough has reached the desired thickness. (For my fettuccine, I went to the second-narrowest setting on my machine.)

When you’re done stretching the dough, lay it on a surface dusted with semolina and cover it with plastic wrap. Repeat with the three other pieces of dough.

Finally, it’s time for the most fun part of the process: cutting the dough into pasta. I used the pasta machine’s fettuccine attachment to cut the dough. You simply attach it to the machine and run the dough through. The blades cut the strands to fettuccine thickness.

Bonus! My first video on Spaghetti & Meatballs! (Thanks to Andrew for serving as videographer.)
Once the pasta is cut, wrap it loosely around your hand to form a “nest.” Sprinkle the nest with more semolina and set it on a semolina-dusted cookie sheet.

Once you’ve made all four nests, freeze the pasta on the cookie sheet for two hours. Then transfer the nests to an air-tight container. They’ll keep for about a month.
When it’s time to eat (yay!), you can transfer the pasta nests directly from the freezer into a pot of boiling, salted water. Watch the pasta carefully because fresh pasta generally cooks faster than dried. And don’t over-sauce — after all this work, you don’t want to miss out on the fresh pasta taste!

Filed under Uncategorized
I Can Cook That: Real Simple risotto
 You can read me today over on I Can Cook That, a fantastic food blog by a friend of mine from college.
I wrote a guest post on a great new risotto technique I recently discovered in Real Simple. I hope you’ll check it out!
Filed under Uncategorized
Little Italy (aka New Jersey)
I don’t exude the “Jersey girl” vibe as much as some people (ahem), but you might know I’m a proud and longtime resident of the Garden State. So I was thrilled when New Jersey Monthly published an Italian-themed issue this month. Here’s an excerpt from the issue’s introduction:
No matter where you travel in New Jersey, you’re never far from an Italian restaurant. Sometimes there are more than one on a given block. And that’s not counting pizzerias.
“When you open a restaurant in New Jersey, automatically you think Italian,” says Anthony Calandra, one of the heads of his family’s bakery, restaurant, hotel and retail enterprises in North Jersey. “We’re so daring that we opened up three Italian restaurants within five miles of each other.
There are reasons for this plenitude. One is that New Jersey is home to a lot of Italian-Americans. According to the U.S. Census Bureau (setting aside margin of error), the state has the fourth highest number of households identifying themselves as of Italian ancestry, after New York, Pennsylvania and California. In percentage of households of Italian ancestry, we rank third, with 17 percent, after Rhode Island (19.3) and Connecticut (18.7).
It’s a fun read. Here are a few other stories in the issue worth checking out:
Filed under Uncategorized
Guest post: The High-Cal Calzone Zone

Every so often, I get a craving for something terribly unhealthy. (Actually, you can probably just drop the “every” from that sentence and have something closer to the truth.) While hearing Ben Wyatt outline his plan to open The Low-Cal Calzone Zone on a recent episode of Parks & Recreation, I found myself laughing, but also hungry. Mmmm, I thought, or possibly said aloud. Calzones. I like them. I could make them.
I was particularly confident because I’d recently found a great pizza dough recipe after months of searching. With that, I figured I was already halfway to calzone success. I soon began looking for recipes, but I couldn’t find one that was exactly what I wanted. Instead, I cobbled a few together, added some twists, and ultimately came up with this.
The High-Cal Calzone Zone: A Tribute to Ben Wyatt’s Pipe Dream
Makes 4 sizable calzones
- 1 batch of your favorite pizza dough (or a fresh dough ball from your local grocery store or pizzeria)
- 1 large ball of fresh mozzarella, grated
- 8 oz. of whole-milk ricotta cheese, fresh if possible
- Additional fillings of your choosing (I used deli ham cut into strips and minced garlic, but I’m sure peppers, spinach, mushrooms, sausage, onions or any other pizza favorites would be delicious, too)
- 1 egg, beaten
- Garlic powder, to taste
- 1 jar of your favorite marinara sauce
Preheat oven to 375˚F and line two baking sheets with parchment paper.
Divide the pizza dough into 4 equal parts. On a well-floured surface, roll one chunk of the dough into a large, fairly thin circle, about 8” in diameter. On half of the circle, spread ¼ of the ricotta. Sprinkle with garlic and ham (or other fillings of your choice) and top the whole thing with ¼ of your grated mozzarella.
Using a pastry brush, paint a thin layer of egg along the outer edge of the dough half you just filled. Fold the other half of the dough on top and pinch the edges together. (You may want to press along the edges with a fork to make sure things are fully sealed.)
Carefully place the calzone onto a lined baking sheet. Paint the top with a thin layer of egg. Sprinkle with some garlic powder if desired.
Repeat the entire process with your remaining three pieces of dough.
Bake the calzones for 25-30 minutes in a preheated oven until golden brown. While your calzones are baking, heat marinara in a small saucepan on low. Serve the sauce alongside your calzone as a dipper, or spread it across the top.
Note: If you’re a party of two, I recommend making and baking all four calzones at once, but pulling out the two you’re going to save a few minutes early. Then, you can just re-bake them the next day — try 15-20 minutes at 400˚F.
Filed under Uncategorized
Semi-veganism, Italian style
Since my resolution last winter to only consume meat from sustainable sources, my meals of cheeseburgers, chicken pot pie, and even meatballs, have been few and far between. Going “almost meatless” wasn’t a drastic step for me, considering that I’ve tended toward meat-free meals since I started cooking for myself. As the New Year arrived, I started itching for a new challenge.
Around the same time, Mark Bittman of the New York Times wrote a short piece on “semi-veganism.” For better health, he wrote, try to avoid all animal products just once a week. Not only is meat off the menu, but so are milk, eggs, cheese, and more. This is not a lifestyle I could sustain long term (some of my favorite foods are ice cream and peanut butter!), but I loved the idea of incorporating vegan meals into my diet.
That wasn’t enough, though, to motivate me to find and make a vegan recipe. I needed another push to get onto the semi-veganism bandwagon. It came a few weeks later when I read Having Faith by biologist/ecologist Sandra Steingraber. The nonfiction book tracks Steingraber’s first pregnancy through her scientist eyes revealing the many environmental dangers that threaten the baby. One fact from the book that I can’t get out of my head is the status of breast milk as “the most contaminated of all human foods.” Environmental toxins concentrate as they move up the food chain. We ingest more toxins eating animals and animal products than we do eating vegetables, which are lower on the chain. (You can read my full review of Having Faith on Goodreads.)
Inspired — and more than a little alarmed — I referred back to Bittman’s piece to review his recipes for the semi-vegan. I found the most familiar recipe (Pasta, Beans and Tomatoes) and tweaked it based on ingredients we already had at home. Here’s how I made it last night: Sauté a clove of minced garlic in olive oil in a deep skillet over medium heat. Add 1 cup of canned tomatoes and cook for 5 minutes, or until saucy; add 1 cup of cannellini beans and heat until bubbly. Add another clove of minced garlic, then half a box of cooked elbow macaroni. Add some dried basil and a bit more oil and serve. Makes enough for two big dinner portions and is best eaten with a spoon.
(Note: I used Muir Glen canned tomatoes because they don’t contain BPA. See my earlier post on BPA in canned tomatoes.)
This was an Italian-style dish — though the cheese is notably absent. Andrew added some to his dish, but I didn’t even miss it. Without the cheese to overpower the other flavors, I enjoyed the light and delicious tastes of tomatoes and garlic and basil. If every vegan meal tasted like this, I might (might!) be tempted to ditch cheese altogether.
Filed under Uncategorized
Butternut Squash Risotto

When I heard we were getting butternut squash puree from our winter CSA program, I was thrilled. Who doesn’t love sweet and creamy butternut squash?
But when I started thinking about how to use the squash, my recipe ideas weren’t all that inspired. Butternut squash soup or butternut squash soup?
Then my friend Molly, also a CSA member, mentioned she was making butternut squash risotto. The dish turned out well (her husband raved!), so I asked for the recipe.
Like other risottos, the taste is rich, smooth, and almost decadent. The flavor of the squash comes through, but it’s not overwhelming. I’d definitely make this again.
Butternut Squash Risotto, adapted from Williams-Sonoma:
Ingredients
- 1 tablespoon unsalted butter
- 1 cup chopped onions
- 6 cups chicken stock
- 2 cups butternut squash puree
- 2 tablespoons olive oil
- 2 cups Arborio rice
- 1 tablespoon dried sage
- 1 teaspoon dried rosemary
- 1/2 cup dry white wine
- 1/2 cup grated Parmigiano-Reggiano cheese, plus a few tablespoons
- Salt and freshly ground pepper, to taste
Directions
Melt the butter in a saucepan over medium heat. Cook the onions in the butter until they are soft and translucent. Set aside.
In the same saucepan over medium-high heat, stir the stock with the squash puree until combined. Bring to a simmer and maintain over low heat.
In a large pot over medium heat, warm the olive oil. Add the onions and rice, stirring until the rice is nearly translucent (about 3 minutes). Stir in the sage and rosemary. Add the wine and stir until the liquid is absorbed.
Add the stock mixture to the rice mixture one ladleful at a time, stirring constantly. Each time the stock is almost completely absorbed, add another ladleful.
When the rice is tender, but slightly firm, and creamy (about 30 minutes), stir in the 1/2 cup of cheese, salt, and pepper. Let stand for 2 minutes before serving. Sprinkle with remaining cheese. Serves 6.
Filed under Uncategorized
My perfect peanut butter
 I’ve been making my own peanut butter for several months now (thanks to my handy food processor). But after weeks of “that’s not quite right” and “that barely even resembles peanut butter,” I think I’ve found my ideal recipe.
Why the caveat declaring this my ideal recipe, but not THE ideal recipe? Different brands of store-bought peanut butter taste mostly the same. Once you choose creamy or chunky, you know what you’re going to get.
But when you start making your own peanut butter, the possibilities are endless. Don’t have much of a sweet tooth? Go all natural with a single-ingredient (peanuts, of course!) PB. If you prefer a sweeter peanut butter, will you sweeten with sugar or honey? Want to create the creamy version of honey-roasted peanuts? Add copious amounts of honey and salt.
As you might have guessed, I’m all about sweet peanut butter. Because I love taste of honey, which is stronger than sugar and comes through in the PB flavor, I chose it as my sweetener. Alas, adding only honey to the peanuts creates a dry, crumbly mess in the food processor. Oil didn’t help much, but butter did.
Here’s the recipe, adapted from The Purposed Heart:
- 1 cup dry roasted peanuts
- 1 tablespoon honey
- 2 tablespoons butter
- Dash of salt
Blend the ingredients in the food processor until they form a ball and the ball thins out. Store in the refrigerator.
Filed under Uncategorized
The science of pasta
If we’ve ever gotten into a conversation about food, you’ve probably heard about my interest in the science behind cooking. I want to understand how eggs affect the consistency of homemade ice cream and how the humidity in my kitchen can change the taste of fresh pasta.
According to the New York Times, researchers have taken the science of pasta to a whole new level. Scientists are uncovering the mathematical equations behind our favorite pasta varieties — from spaghetti to gemelli. One researcher has written blog posts on the topic. Others wrote a book about the pasta “family tree.”
Talk about food for thought. (Thanks to Molly for the tip!)
Filed under Uncategorized
Delicious quotations about Italian food
Since I made fresh pasta for New Year’s Eve, I haven’t been cooking much Italian food. My tastes have taken me in other directions, as I’ve tried to perfect my homemade peanut butter recipe (which I’ll share once I get it just right) and cooked my first Indian dish.
So to get back in the spaghetti-making spirit, I thought I’d share a few of my favorite quotations about Italian food. Enjoy!
“One has to be an idiot to speak badly of macaroni.” – Italian proverb
“At the table with good friends and family you do not become old.” – Italian proverb
“No man is lonely eating spaghetti; it requires so much attention.” – Christopher Morley
“The trouble with eating Italian food is that 5 or 6 days later you’re hungry again.” – George Miller
“Everything you see I owe to pasta.” – Sophia Loren
“The definitive recipe for any Italian dish has not yet appeared. We are still creating.” – Luigi Barzini
Filed under Uncategorized

